Programming your BlinkyTape's firmware
We’re about to do some very exciting stuff — we’re going to put a whole new program right on your Blinkytape. Since this is a pretty small program that runs on a piece of hardware, we’re going to call it firmware. If you’re not familiar with the term already, you’ll probably hear the term again when you’re updating the software on a new camera, TV, car, or smart fridge. At the end of the day, it’s a program like any other that runs on a tiny computer in the Blinkytape.
So, in order to make new firmware for your Blinkytape, we’re going to install the Arduino environment, followed by a few special libraries. Then we’re going to show you how to get a simple program on there. At that point, you should have the basic knowledge you need to get started on your own, so it’ll be time for us to tearfully send you out into the world by yourself.
Install Arduino
Our first step is to download the Arduino development environment. We made Blinkytape compatible with Arduino because it has a huge community and runs in Windows, Mac OS X, and Linux — so, chances are good that you’ll be able to run it on your computer and also find help if you get stuck anywhere.
The fine folks at Arduino have this covered very well, so head over to the Arduino Getting Started page for detailed install instructions. The installation process is very straightforward and they have good documentation if you have any trouble.
If you’re having trouble picking a version, BlinkyTape is known to work with Arduino version 1.6.0.
Using Windows? Install the drivers!
If you’re using Windows, you’ll need the drivers for both BlinkyTape and Arduino before you can program your tape this way. Make sure that you install PatternPaint, which will automatically install the Blinkytape drivers.
Install the BlinkyTape Arduino Libraries
Our next step is to download and install a couple of things that we’ve used to make the Blinkytape firmware better. If you don’t know what a library is, don’t worry — just think of it as some helper code. We’ll download and install these libraries so we can use the example code. Later on, when you’re making your own firmware, you’ll see how some of these libraries make it easier to program for BlinkyTape.
First get this — it’s called ‘FastLED’ and it’s for talking with LED strips like the one in your BlinkyTape.
Next, grab this! This one is called ‘BlinkyTape’ and it’s all the stuff we wrote, including our example code.
Install ’em.
The best to install these libraries is to use the automatic method of installing Arduino libraries.
Restart Arduino if it is running.
You can handle this one on your own!
Connect your BlinkyTape to your computer
Using a micro-USB cable, connect your BlinkyTape to a USB port on your computer. If this is the first time, prepare to be wowed by an epically awesome rainbow.
Prepare Arduino to Program Your BlinkyTape
We’re going to configure the Arduino environment to put software onto your Blinkytape. This should be pretty easy.
- Choose Tools -> Board -> Arduino Leonardo
- Select your BlinkyTape’s serial port in the Tools -> Serial Port menu. The port will be named something like ‘COM2’ on Windows, and something like /dev/tty.usbmodemab123 or /dev/cu.usbmodemab123 — you can choose either one.
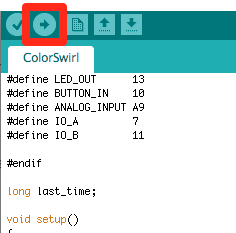
Load the default firmware – ColorSwirl.
Let’s just practice to make sure we have this part down.
- In the menus for Arduino, choose File -> Examples -> BlinkyTape_Arduino -> ColorSwirl
Program the BlinkyTape
Press the Upload Button in the upper right hand corner of the Arduino window to program your BlinkyTape. It should look like this:
If all goes welll, Arduino won’t have a message for you, but your BlinkyTape should pause for a few seconds as the program is uploaded.
If that all went well, it should look just like when you first plugged in your BlinkyTape.
Load the “Hello World” Program in Arduino
- Open Arduino
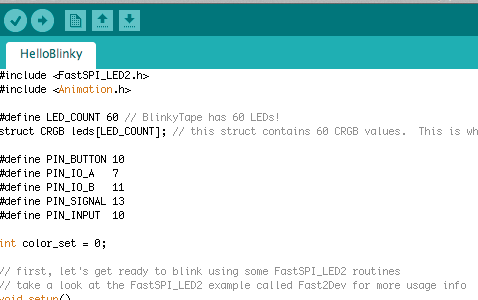
- In the menus, choose Examples -> BlinkyTape -> HelloBlinky
- You should see something like this:
Make Your Changes!
HelloBlinky will cycle through the BlinkyTape’s primary colors, with a slight gradient that will make it look like the color is fading in from the end of the strip. First, let’s change the speed at which it cycles to make it super fast.
Look for this lines:
int waiting_time = 40; //time in ms for color scaling
Change the value from “40” to say, “4” so that your code looks like this:
int waiting_time = 4; //time in ms for color scaling
Press the Upload button again, like we did in step 6. This will send your new version of the program to the BlinkyTape. When the upload is complete, the BlinkyTape should be flashing at your new preferred speed!
Ok, Let’s Try Some Bigger Changes!
OK, so that was super-easy right? Right. Let’s try something a bit more fun.
Now let’s find the lines where we set the color. There are three lines that look something like this:
case 0: leds[i] = CRGB(i*3,0,0); break;
This is a line in a loop that increases that “i” variable, and “i” is going to be the number of the individual LED we’re setting. We’re giving each LED an RGB value, and we also use that “i” variable to help us set the color. This line will make the LEDs a brighter red at one end than the other.
But let’s change each of them so they have a color gradient instead of just brightness. To do that, we need to set two colors in each line. Let’s make the first one (and first means “0” since this is a computer!) go blue to red, the second one red to green, and the third green to blue. We’ll use that “i”variable that holds the LED number twice now, so instead of just increasing the red one, we’re going to use that number to decrease the blue setting at the same time.
For the first one, let’s try this:
case 0: leds[i] = CRGB(i*3,0, 180 - (i*3)); break;
And for the second, let’s do:
case 1: leds[i] = CRGB(180 - (i*3),i*3,0); break;
I think you can figure out what the third one should be. Punch it in, then click that arrow button one more time to put your new, modified program on your Blinkytape, and Wow! That really kicks up the awesome quotient, right? Now, I think you’re starting to see the possibilities of this clever little LED strip.
Compatibility! Or: you might want to keep serialLoop()
One important note: the above example won’t work with other BlinkyTape software like PatternPaint. However, it’s very easy to make your custom BlinkyTape firmware compatible with other BlinkyStuff! All you have to do is to include the function called serialLoop().
Look for a function that starts with this line:
void serialLoop() {
Copy the whole function into your custom Arduino Sketch, and then include these lines in your main loop:
if(Serial.available() > 0) {
  serialLoop();
}
That should do it! Now you can use your own custom firmware with PatternPaint and other BlinkyTape software.
Special Stuff for Uber-pros
So, you might have noticed that we’ve been asking your BlinkyTape to pretend that it’s an Arduino Leonardo. That’s totally fine, since we’ve made sure that all of our software will work when that’s the case. However…there’s a little more to the story. There’s an additional github repository, that contains the code to let your BlinkyTape think it’s still a Blinkytape. You shouldn’t need to do this, but if you’re flashing a BlinkyTape for a friend who runs Windows and doesn’t have Arduino installed, you might want to grab these files. Just make a folder called hardware in your documents/Arduino folder and drop the files in there.
There’s also some interesting stuff in this Github repository — this contains the actual ProductionSketch, as well as the physical designs for the PCB boards, in case all of this programming stuff is just a little too virtual for you!
Next Steps
- Learn more about how we’re controlling the LEDs – check out FastLED by going to File -> Examples -> FastLED
- For even more information, check out their documentation, which includes reference materials like info on the CRGB color class and methods for setting LED color.
- It’s a great idea to check out the Arduino Programming Reference if you’re not already familiar.
- When you have a new firmware, share it with everybody!
Troubleshooting
If the program fails to compile or upload, or the BlinkyTape is not doing what you expected, there could be a number of things to check.
Compile Errors
Sometimes, when you try to put your new firmware on your Blinkytape, you’ll see something like this:
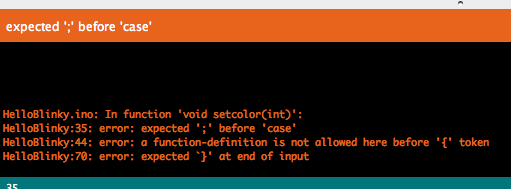
This means that there’s an issue with compiling your few program. You’ll need to fix that before you can put the new firmware on your BlinkyTape. See if you can fix the compile errors — the Arduino editor will give you some clues, including the line number where it ran into the problem. You’ll find that these issues are often very simple, like a missing semicolon at the end of a line, or mismatched brackets. Check the Arduino programming reference if you get stuck.
Upload Errors
First off, unplug your BlinkyTape, then plug it back in. If you’ve made a successful upload in the past, this will almost always take care of the issue. When it’s plugged in, the tape should be playing the last pattern you programmed onto it.
- Check to make sure that your Tools -> Board setting is set to Arduino Leonardo. (Or BlinkyTape if you have the special package installed.)
- Check to make sure that your Tools -> Serial Port setting is set to the right thing.
BlinkyTape Not Acting Right
¯(°_o)/¯
Uh oh. This is where it gets fun. If your new program compiles, and you can flash it to your BlinkyTape, but isn’t having the desired effect, it’s time to rethink your approach. Read through your program again and think out each step. You’ll often be able to use logic to figure out what’s gone wrong. If all else fails, you can always go back to the original firmware, found at File -> Examples -> BlinkyTape_Arduino -> ColorSwirl — but make sure to save your custom program for later!