BlinkyTape Troubleshooting guide
There are a few issues that you might run into while you’re getting up and running, or while you’re creating your BlinkyTape magnum opus. Here are a few suggestions on how to get going again if you run into an issue.
I’m having trouble getting started on Windows
While platforms like OS X and Linux don’t need special drivers for the BlinkyTape, Windows does. The easiest way to do get them is to install PatternPaint, available here: PatternPaint Releases
On Windows, you’ll need this even if you plan to make your own custom software. Note that during installation, the drivers are also copied to “C:\Program Files (x86)\Pattern Paint\driver\blinkytape”, in case you’d like to install them manually. Also note that Windows 10 includes a compatible CDC ACM driver, so this installation is not strictly necessary on that platform.
My Mac won’t let me run PatternPaint
Official PatternPaint releases are digitally signed using our Apple developer key, however by default, macOS comes configured to only runs programs downloaded from the Mac App Store. If you’ve never installed an application downloaded from the internet, you may need to change your system settings to allow PatternPaint to run.
To do so, click on the Apple logo on the top-right corner of your screen and go to System Preferences. Then click on Security & Privacy in the top row. On the next screen, you should see an option that says “Allow applications downloaded from:”. Set it to “Allow applications downloaded from: Mac App Store and Identified Developers.”
I’m having some odd issues with my BlinkyTape on Ubuntu…
It seems that Ubuntu 13.10 runs a program called ‘modem-manager’ that identifies your BlinkyTape as a modem and tries to talk with it. In this ase, the tape will work for a moment, then stop updating, and first 10 or so LEDs on the strip will turn black.
The easiest way to fix this is to remove the modem manager software completely:
sudo aptitude remove modemmanager
If you do need to use a dial-up modem, you may be able to stop the service temporarily, but most users can just remove this program without any problems.
My BlinkyTape was just working, but now I’m getting a strange error message in Processing (or another program)
Most likely there’s no reason to worry here. If you’re seeing red text down in the bottom console box of Processing or Arduino when you try to run or upload a program, most likely the code that talks to your serial port is just confused.
Luckily there’s a quick fix: stop your program (if it’s not already) disconnect your BlinkyTape, then reconnect it and try again.
My BlinkyTape isn’t being recognized by my computer any more!
There are a couple of reasons this could happen; the good news is that it can usually be fixed by restoring the firmware on the tape. Here are some steps to try:
Disconnect any USB hubs, and try a different USB port
Since the BlinkyTape draws a moderate amount of power (500mA), it needs a port capabile of delivering a reasonable power. Unpowered hubs might not be able to deliver enough voltage to power the tape correctly. Also, sometimes the USB ports on a computer are wired differently from each other internally, so simply switching the port might do the trick.
Try a different microUSB cable
Not all microUSB cables are created equally, so make sure you are using a good quality cable to connect your BlinkyTape. In particular, cables that are designed for charging cell phones might lack data cables, meaning that they will be able to provide power to the BlinkyTape, but not allow it to communicate with a computer. In addition, cables do wear out or break, so if your BlinkyTape recently stopped working, the issue might actually be with the cable.
Try restoring the firmware
If you’ve aleady tried a different USB port and cable, the next issue might be with the firmware on the BlinkyTape. Try following these steps:
- Download and install the most recent PatternPaint
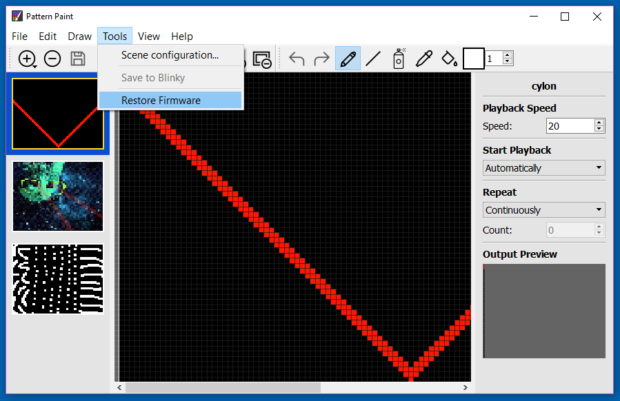
- Run PatternPaint, and from the ‘Tools’ menu choose ‘Restore Firmware’:
- PatternPaint should show the ‘Restore Firmware’ dialog
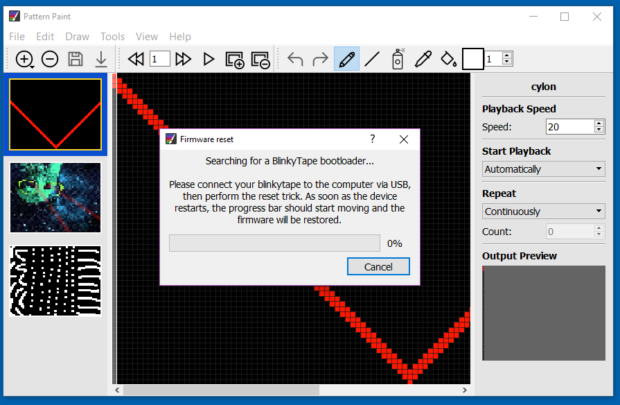
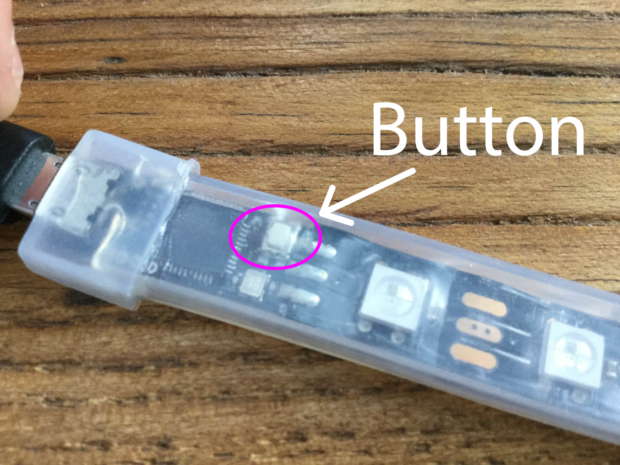
- Connect a USB cable to the BlinkyTape, but don’t plug it into the computer yet. Find the small button (see below) on the BlinkyTape controller, and press and hold it down.
- Continuing to hold down the small button, plug the USB cable back into the computer.
- Patternpaint should detect the controller automatically and restore its firmware
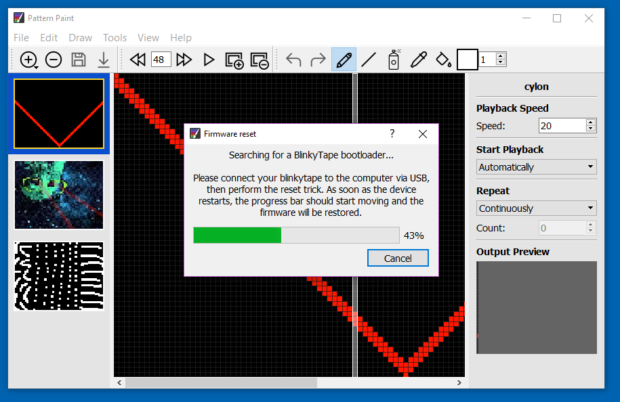
That should do the trick, however if you have an older BlinkyTape (from the initial Kickstarter production), your BlinkyTape may have an older bootloader version. In that case, you’ll need to use an alternate method, the “reset trick”. Follow the instructions 1-3 above, then connect the tape to the computer using a USB connection, and short these two points together using needles:
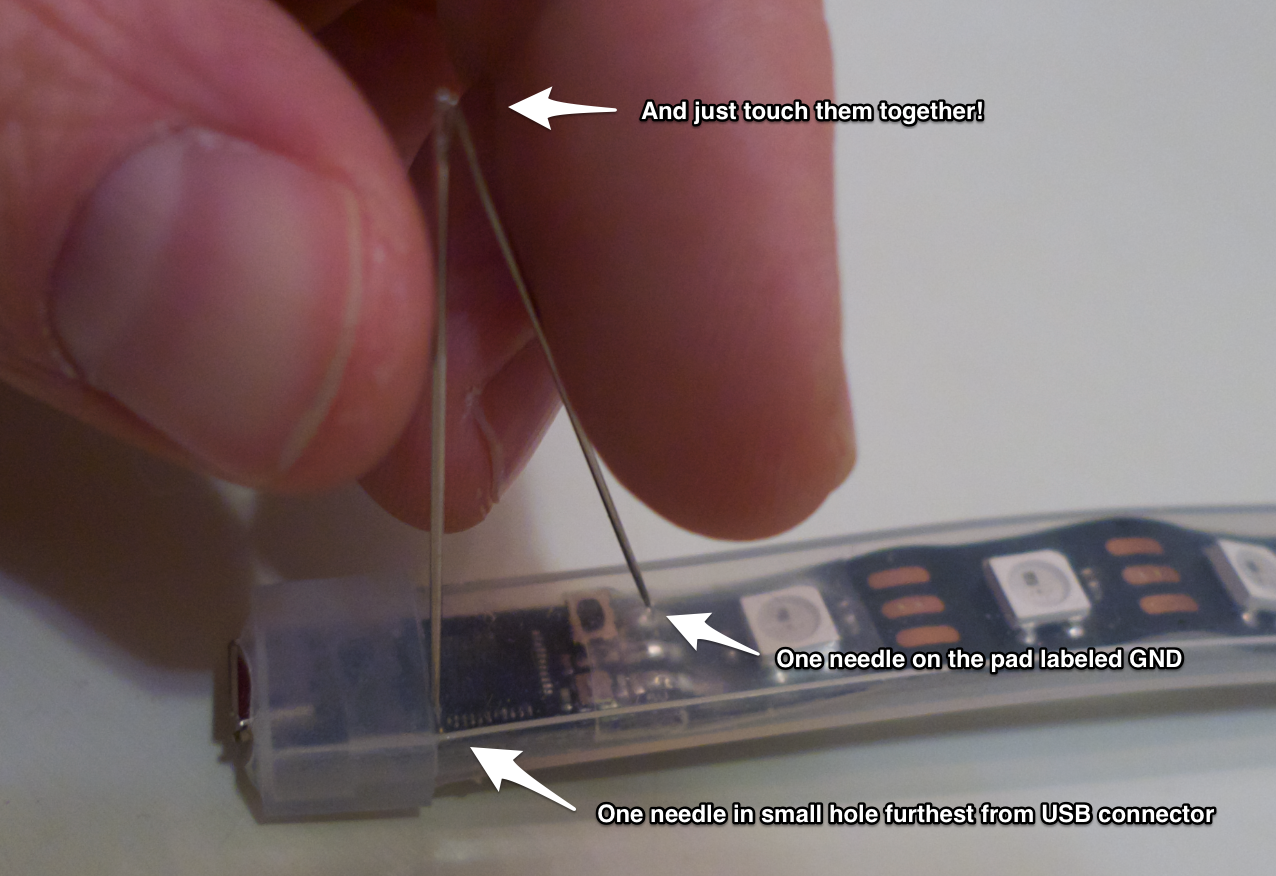
We’ve found that it’s easy to use two sewing needles to reset the tape without peeling back the protective cover. There are four small holes near the USB connector – place one needle in the one furthest from the connector, and then push one so it’s touching the ground pad. Touch the two needles together and the tape will go into reset mode.
Windows: Advanced: Completely remove PatternPaint and drivers
If you want to try deleting all traces of PatternPaint, try these steps:
- Run the uninstaller from the ‘Add or Remove Programs’ menu. This should remove the program files, but will leave the settings and drivers untouched.
- Verify that all the files were delete by checking for a ‘Pattern Paint’ directory in:
32-bit windows: ‘C:\Program Files\Pattern Paint’
64-bit windows: ‘C:\Program Files (x86)\Pattern Paint’
It’s safe to completely remove this directory - Remove any custom firmware by removing the directory ‘Pattern Paint’ from your user directory. This will only have been created if you added a custom firmware.
- Advanced- use the registry editor to remove the PatternPaint preferences. They are located at:
Computer\HKEY_CURRENT_USER\SOFTWARE\Blinkinlabs - Remove any installed Blinkinlabs devices from the system. Run the Device Manager, then select view->show hidden devices, and expand the option ‘Ports(COM & LPT)’. Look for any of the following devices:
‘BlinkyTape’
‘BinkyTape bootloader’
‘Blinkinlabs Light Buddy’
‘Blinkinlabs BlinkyPendant’
‘Blinkinlabs EightByEight’
Right click on each one and select delete, then on the ‘Confirm Device Uninstall’ page, and be sure to click ‘Delete the driver software for this device’ as well. - While still in the Device Manager, expand the option ‘libusb (WinUSB) devices’. Look for any of the following devices:
‘LightBuddy Bootloader’
‘EightByEight Bootloader’
‘BlinkyPendant Bootloader’
And repeat the same procedure. Depending on which Blinkinlabs products you’ve used, you may also have some more entries under the option ‘Other devices’, which should also be deleted:
‘BlinkyPendant Fadecandy’
‘LightBuddy Fadecandy’
That should remove anything that PatternPaint might have installed.
Still no worky!!!
OK, challenges are interesting and we are eager to meet and overcome them! Try heading to the forum or emailing us at support@blinkinlabs.com.